
Home > Documentation for RhinoResurf
Table of Contents
1. Introduction
Download and Install RhinoResurf for Rhino 4 (32-bit) and Rhino 5/6/7(64-bit)
Loading RhinoResurf into Rhino 4.0 (32-bit) and 5/6/7(64-bit)
2. Command Reference
Tutorial 1 - Convert a mesh to a surface
Tutorial 2 - Convert a surface from a sub-mesh
Tutorial 3 - Drape a surface over a point cloud
Tutorial 4 - Convert a mesh to multiple surfaces with quad face
Tutorial 5 - Use Fix button to smooth the wavy surface in _RsMesh2Surfs
Tutorial 6 - Convert a mesh to multiple surfaces with trimmed surface
Tutorial 7 - Automatic surfaces (solid) generation from mesh
Tutorial 8 - Single surface from curves
Tutorial 9 - Point cloud to mesh
Tutorial 10 - 6 Steps to create a solid from mesh by using RhinoResurf
Tutorial 15 -Fill hole with surface on G1 continuity with neighbor patches
FAQ 1 - Why RhinoResurf register dialog does not display in my Rhino
RsPoints2Surf 
Menu Button |
RhinoResurf > Single surface from points |
Command Name |
RsPoints2Surf |
Video:

click here to view video
Command description:
This command let user drape a single surface over a point cloud or morph a initial surface to target point cloud position.
To drape a surface over a point cloud :
1. Click Single surface from points from the Resurf menu or type RsPoints2Surf at the Rhino command prompt.
2. Click left-mouse button to select a point set, then click right-mouse button.
3. The Single surface from points dialog box is displayed.
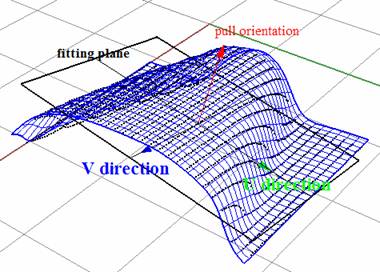
4. You will see a fitting plane and a coordinate frame with three different colors in the graphics(See the following picture). The red arrow means pull orientation (dx, dy, dz) which is the normal of the fitting plane; The green arrow means U direction for NURBS surface; The blue arrow means V direction for NURBS surface. Also, you will see a surface, this surface is an initial surface which helps you check if the result is satisfactory, if so, click Apply to get an advanced fitting; Otherwise, change the pull orientation (dx, dy, dz), click Preview to look for a better initial surface.
Dialog description:
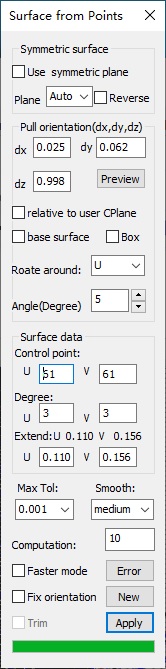 |
Symmetric surface: create symmetric surface from the selected points. use symmetric plane: check this button to activate the 'Plan' option. Plane: slection for type of symmetry plane. Symmetry plane type options: Auto: the program figures out a symmetric plane automatically. YOZ: specify a plane parallel to the YOZ plane as the symmetry plane. XOZ: specify a plane parallel to the XOZ plane as the symmetry plane. XOY: specify a plane parallel to the XOY plane as the symmetry plane. Any: pick a plane as the symmetry plane. Reverse: use the point cloud data on the other side of the symmetry plane as the input data for calculation.
Click here to view video Pull orientation: pull orientation (dx, dy, dz) is the normal of the fitting plane. The pull orientation determines the quality of surface. Generally, RhinoResurf will calculate a optimum pull orientation for surface fitting. However, sometimes, it may be bad for some cases, Pull orientation lets user change the orientation (dx, dy, dz) for better surface generation. To use this pull orientation, user needs to understand that the fitting plane influences the quality of the surface in determined zones. dx: x-axis coordinates of pull orientation(dx,dy,dz). dy: y-axis coordinates of pull orientation(dx,dy,dz). dz: z-axis coordinates of pull orientation(dx,dy,dz). Preview: after you changed the pull orientation (dx, dy, dz), click Preview , an initial surface will generate, this surface helps you see the result directory. However, the surface is only an initial surface, the tolerance may not be satisfactory. Relative to user CPlane: This check box determine whether the pull orientation (dx, dy, dz) is defined as a world coordinate or relative coordinate. When this box is checked, the pull orientation (dx, dy, dz) will be used as relative to the user defined construction plane (CPlane); otherwise the pull orientation is used as a world coordinate. Sometimes, it is helpful for user to define a pull orientation relative to construction plane than the world coordinates. Base surface: If user already have an initial surface and wants to morph the surface to the target position of point cloud, this check box helps user do this job. User checks this check box and selects an initial surface, then cick Apply button for morphing. When this buton is checked, pull orientation is not used any more. Box: This check box allows user to select a sub-set of the points to fit a surface. User check this button and select a box, only the points bounded in the box will be used to create surface. Rotate around: specify the rotation axis to rotate the fitting plane. Rotation axis type: U:An arrow indicating the U direction in the view. V:An arrow indicating the V direction in the view. N:An arrow indicating the N direction in the view. Angle(Degree): the angle value of each rotation of the fitting plane. Click the up arrow button on the right of the angle text field to rotate the fitting plane counterclockwise; Click the down arrow button to rotate the fitting plane clockwise.
click here to view video Surface data: here user has the ability to set control point number , degree number and extending value for the surface. Such as Control point: u = 43, v = 23. Order u=3, v=3. The maximum control point is u=300, v=300; The maximum order is u=9, v=9. This panel is designed for those users who would like to control the surface in advanced way. The high order surface is used for designing optical product. Generally, however, user does not need to care this control point number, the program will calculate a suitable number automatically. Max Tol: the maximum deviation between surface and point. Smooth: the smooth controller of the surface. Computation: time limitation for computation, the number is greater, the computation time is longer. Faster mode: when user wants to run with large set of data (such as the point number is greater than one million,checking this button will speed up the computation. Fix orientation: If this check box is selected, the surface fitting calculation will always based on a fixed direction. For example, the surface will always changes along the Z axis. Error: export the report of deviation between the points and the surface. Apply: user click this button to generate surface. After a surface is generated, if the tolerance is not desired, user can continue to click this button to get a surface with better precision. Trim: trim the surface by using boundary line of the point cloud. This button is enabled only after the surface was created successfully. When user check this button, the program will detect the boundary line automatically and trim the surface. New: click this button to pick a new point cloud for surface reconstruction, and the currently obtained surface will be saved.
|
Tutorial:
Draping a surface over a point cloud.