|
|
| Home | Products | Purchase | Change log & Road map | Gallery | Support | Download | Contact | 中文 | |
Home > Documentation for RhinoResurf
Table of Contents 1. Introduction
2. Command Reference
|
Tutorial 17 - Method for quickly converting cylindrical topology mesh surface into smooth NURBS surfaceIn this tutorial we will show how to convert a 3D cylinder topologic mesh ( e.g a shoe last surface) into 2D mesh. Command used: RsMesh2Surf, MeshSplit, RsMergeMeshs
Video:
If the above video is invalid, please click here to download the video The NURBS surface reconstruction method introduced in this article is applicable to the latest version of Rhinoresurf v4.x for Rhino 6/7, RhinoResurf V3.340 for Rhino 6 and RhinoResurf V3.340 for Rhino 5 64-bit.
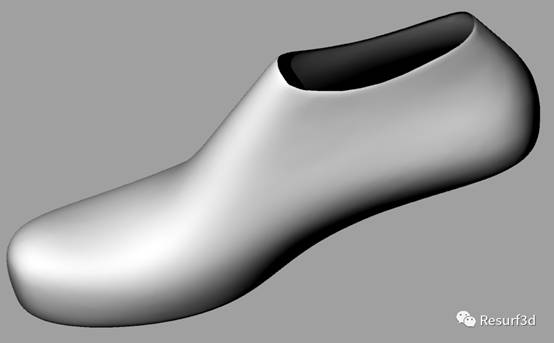
For complex mesh surfaces, usually reverse engineering software will complete the NURBS surface reconstruction through the "region-facet" step. But the RhinoResurf can classify according to the overall topological shape of the mesh model and reconstruct the corresponding smooth surface. This article introduces the method of using RhinoResurf to quickly convert a shoe last mesh surface into a smooth NURBS surface. As shown in the figure above, the shoe last surface (no bottom face, no top face) is a "cylindrical topology" surface, so it can be directly reconstructed into a NURBS surface with a non-periodic U direction and a periodic V direction. This surface is smooth and continuous everywhere, suitable for high-precision machining occasions. The following Figure 1 and Figure 3 are the original mesh model of the last, and Figure 2 and Figure 4 are the reconstructed NURBS surface model.
Figure 1. mesh model of shoe last
Figure 2. A single smooth NURBS surface reconstructed based on the shoe last mesh model (with closed periodicity in the V direction)
Figure 3, shoe last mesh model (viewed from the bottom up)
Figure 4, the shoe last NURBS surface viewed from the bottom up
RhinoResurf is a very simple and efficient tool for making such a complex large surface, and it can be completed in a few steps. You can save time and spend your time enjoying life. Step 1: Import the mesh model in Rhino, as shown in Figure 1 above; Step 2: (You can skip this step if you use the plane to create surface, see the above video)Use a plane to cut a section line on the mesh. Create a plane that passes through this mesh, as shown in Figure 5 below. Note that the intersection of the plane and the mesh model at the heel of the shoe is perpendicular to the sole surface (the red line in Figure 6). Then call the _MeshSplit command, select the plane as the cutting tool to split the mesh model into two meshes, and finally call the command _RsMergeMeshs, directly pick up the two split meshes, press the right mouse button to combine them into a mesh, As shown in Figure 6, the red line is the dividing line (this line is added here for clarity, and will not be displayed during the mesh division and merge process).
Figure 5. The plane intersects the mesh
Figure 6, the mesh after the plane is divided and merged, the red line is the intersection line of the division
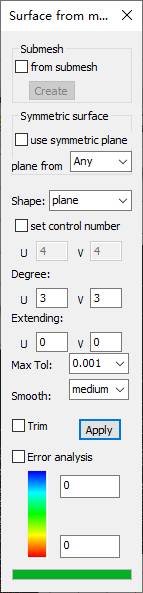
Step 3: Create a surface. Enter the command _RsMesh2Surf on the Rhino command line (Note: This command will only be effective after the RhinoResurf plug-in is successfully loaded into Rhino). Pick the mesh and press the right mouse button. The program will pop up the following dialog box (Figure 7).
Figure 7. surface reconstruction dialog
Pull the "shape" option box, select "cylinder (quick)", then the Rhino prompt will show 'Select options ( Plane Vertex Exit ):' , this means user has 2 methods to create an iso-line on the mesh , one is to select a plane (Plane option), the other is to selecting 2 vertexes (vertex option). (see Figure 8)
Figure 8, Rhino command line prompt information: select option In this case, we select 2 Vertexes ( for the case of 'select plane', see the above video), then in Rhino prompt you will see "pick two vertices on the two boundary lines of the mesh to generate the parameter line, if not, please press Right mouse button skip this step "(Figure 9), you can directly press the right mouse button to skip" pick ", return to the dialog box shown in Figure 7, and press the" Apply "button in the dialog box, the program will start to calculate . In this case, wepick the two points on the shoe top boundary line and the shoe sole boundary line respevtively at the red dividing line shown in Figure 6, and press the right mouse button to return to the dialog box shown in Figure 7, and click the "Apply" button in the dialog box, the program starts to calculate.
Figure 9, Rhino command line prompt information
Later, the shoe last NURBS surface will be reconstructed, as shown below:
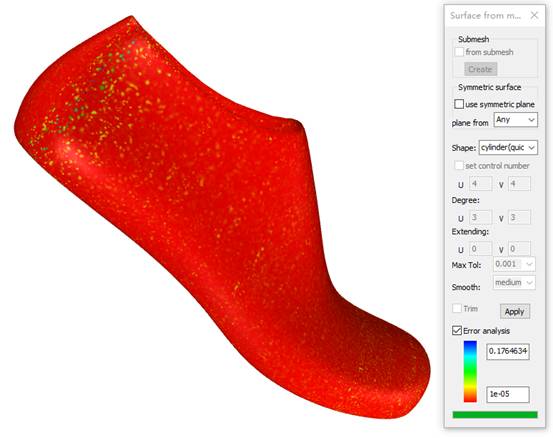
Figure 10, after the surface reconstruction is successful, the mesh model and the surface model overlap display Figures 11 to 14 below show the deviation graph between the NURBS surface and the mesh surface.
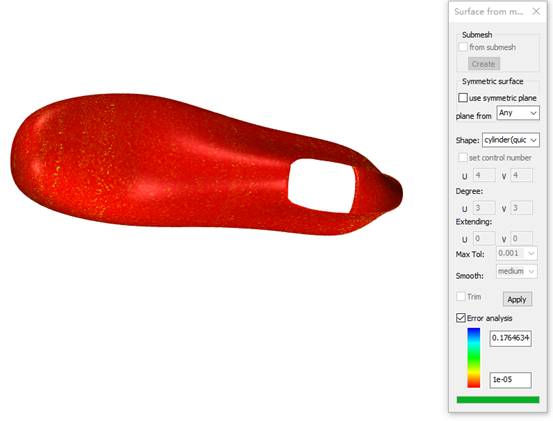
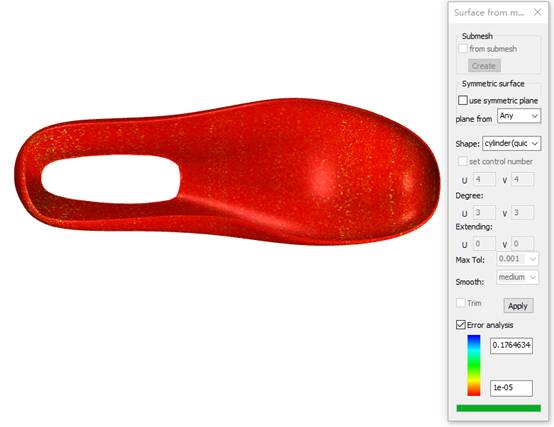
Figure 11, the deviation diagram between the surface model and the mesh model (the maximum is 0.17 mm, most of them are within a small deviation range)
Figure 12, the deviation diagram of the deviation between the surface model and the mesh model from another angle (maximum 0.17 mm, most within a small deviation range)
Figure 13, the deviation diagram of the deviation between the surface model and the mesh model from another angle (maximum 0.17 mm, most within a small deviation range)
Figure 14, from the bottom up, the deviation diagram between the surface model and the mesh model (the maximum is 0.17 mm, most of them are within a small deviation range) Figures 15 to 17 below are the zebra smooth analysis of NURBS surface.
Figure 15. Zebra analysis of surface smoothness
Figure 16, Zebra analysis of surface smoothness (the other side of view)
Figure 17, Zebra analysis of the surface smoothness (look up from the bottom) As you can see in this article, it is so simple to use RhinoResurf to reconstruct the smooth NURBS surface of the last.
|
Copyright (C) 2007-2012 RESURF All Rights Reserved. Privacy Statement |