
Home > Documentation for RhinoResurf
Table of Contents
1. Introduction
Download and Install RhinoResurf for Rhino 4 (32-bit) and Rhino 5/6/7(64-bit)
Loading RhinoResurf into Rhino 4.0 (32-bit) and 5/6/7(64-bit)
2. Command Reference
Tutorial 1 - Convert a mesh to a surface
Tutorial 2 - Convert a surface from a sub-mesh
Tutorial 3 - Drape a surface over a point cloud
Tutorial 4 - Convert a mesh to multiple surfaces with quad face
Tutorial 5 - Use Fix button to smooth the wavy surface in _RsMesh2Surfs
Tutorial 6 - Convert a mesh to multiple surfaces with trimmed surface
Tutorial 7 - Automatic surfaces (solid) generation from mesh
Tutorial 8 - Single surface from curves
Tutorial 9 - Point cloud to mesh
Tutorial 10 - 6 Steps to create a solid from mesh by using RhinoResurf
Tutorial 15 -Fill hole with surface on G1 continuity with neighbor patches
FAQ 1 - Why RhinoResurf register dialog does not display in my Rhino
RsAutoNurbs 
Menu Button |
RhinoResurf >Automated Surfaces from mesh |
Command Name |
RsAutoNurbs |
Video:
To create multiple surfaces from mesh automatically in Rhino 7 :

If the above video is invalid, please click here to download the video
Command description:
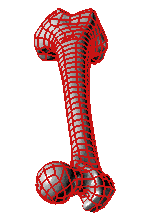
This command helps user create curve network/polygonmesh defined on the mesh, then create multiple surfaces that fits to the mesh. Both of the operations are automatic.
The GUI for this command in Rhino 7 is different from the one in Rhino 6 or before version.
To create multiple surfaces from mesh automatically in Rhino 7 :
1. Click Automatic surfaces from mesh from the RhinoResurf menu or type RsAutoNurbs at the Rhino command prompt.
2. The Automatic surface generation dialog box is displayed.
3. Click checkbox button Fit mesh to set it be checked, and Click Quadremesh button, pick the mesh model, you will see this dialog:


set Target Quad Count as 150, click OK button. You will get a polygon mesh soon.

4. Click button Create Surface. You may need to wait for several minutes to get the surafce model.

Dialog description:
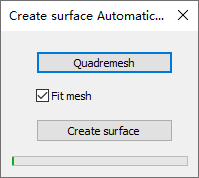 |
Quadremesh : click this button to pick a mesh model and crate a polygon mesh from the model. Fit mesh: if this button is checked, the created surfaces will fit the mesh data, otherwise the surfaces will follow the shape of the mesh. Create surface: click this button to create surface model automatically.
|
----------------------------------------------------------------------------------------------------------------------------
To create multiple surfaces from mesh automatically in Rhino 6:
1. Click Automatic surfaces from mesh from the RhinoResurf menu or type RsAutoNurbs at the Rhino command prompt.
2. Click left-mouse button to select a mesh, then click right-mouse button.
3. The Automatic surface generation dialog box is displayed.
4. Click Curve network to create curve network that is defined on the mesh automatically.
5. Optionally, Click Smooth curve to select a bad curve in the curve network and smooth it to be better.
6. Click Create surface to create multiple surfaces that fit the mesh automatically.
Dialog description:
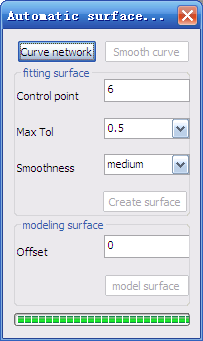 |
Curve network : click this button to create curve network that is defined on the selected mesh. Smooth curve: click this button, then click left mouse button to select a bad curve in the curve network, then click right mouse button, the bad curve will be smoothed. Fitting surface: surface will fit the mesh on the constraint of specified maximum tolerance. Control point: the control point number which is used for creating B-spline curve for every curve in the curve network. The default number is 6. Max Tol: threshold of maximum tolerance between mesh nodes and surface. Smoothness: surface smoothness controller. Exact G1 on star-point: surface is exact G1 continuous on common edge and vertex (start-point). Create surface: click this button to create multiple nurbs surfaces. Modeling surface: model new surfaces from the mesh, the new surface does not fit the mesh on any constraint of tolerance. Offset: the offset value used for modeling surface. The new surfaces will be greater or smaller than the original mesh by adjusting the offset value. Polygon mesh: create a polygon mesh from the original mesh, the element number is reduced. Model surface : click this button to model new nurbs surfaces from the original mesh.
|
Tutorial:
Automatic surfaces (solid) generation from mesh.