
Home > Documentation for RhinoResurf
Table of Contents
1. Introduction
Download and Install RhinoResurf for Rhino 4 (32-bit) and Rhino 5/6/7(64-bit)
Loading RhinoResurf into Rhino 4.0 (32-bit) and 5/6/7(64-bit)
2. Command Reference
Tutorial 1 - Convert a mesh to a surface
Tutorial 2 - Convert a surface from a sub-mesh
Tutorial 3 - Drape a surface over a point cloud
Tutorial 4 - Convert a mesh to multiple surfaces with quad face
Tutorial 5 - Use Fix button to smooth the wavy surface in _RsMesh2Surfs
Tutorial 6 - Convert a mesh to multiple surfaces with trimmed surface
Tutorial 7 - Automatic surfaces (solid) generation from mesh
Tutorial 8 - Single surface from curves
Tutorial 9 - Point cloud to mesh
Tutorial 10 - 6 Steps to create a solid from mesh by using RhinoResurf
Tutorial 15 -Fill hole with surface on G1 continuity with neighbor patches
FAQ 1 - Why RhinoResurf register dialog does not display in my Rhino
RsMesh2Surf  (v4.512037)
Menu Button |
RhinoResurf > Single surface from mesh |
Command Name |
RsMesh2Surf |
Click here to view the help document for the old version 4.51026
Click here to view the help document for the old version 4.51023
Command description:
This command lets user convert a mesh to a single surface.
To convert a mesh to a single surface :
1. Click "Single surface from mesh" from the RhinoResurf menu or type "RsMesh2Surf" at the Rhino command prompt.
2. Click left-mouse button to select a mesh, then click right-mouse button.
3. The "Single surface from mesh" dialog box is displayed.
4. Choose a type of "Shape" that suits the mesh model.
5. Click "Apply" to create surface.
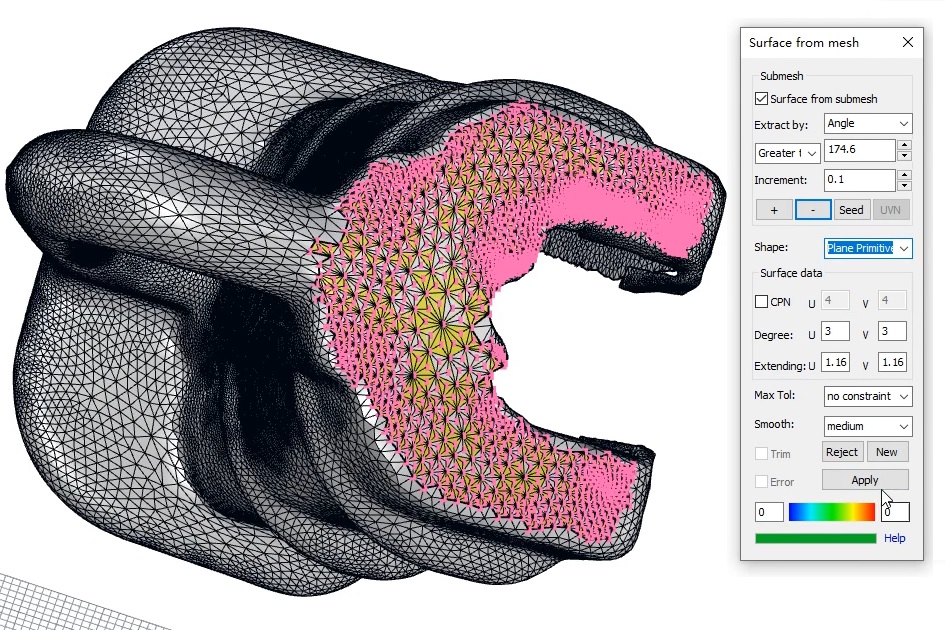
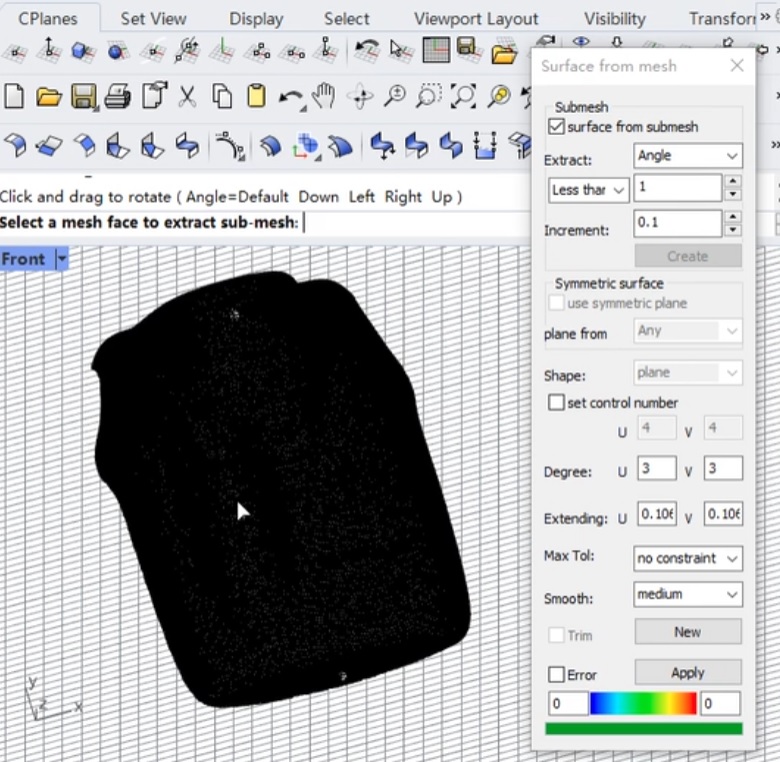
To extract a sub-mesh and convert it to a single surface :
1. Click "Single surface from mesh" from the RhinoResurf menu or type "RsMesh2Surf" at the Rhino command prompt.
2. Click left-mouse button to select a mesh, then click right-mouse button.
3. The "Single surface from mesh" dialog box is displayed.
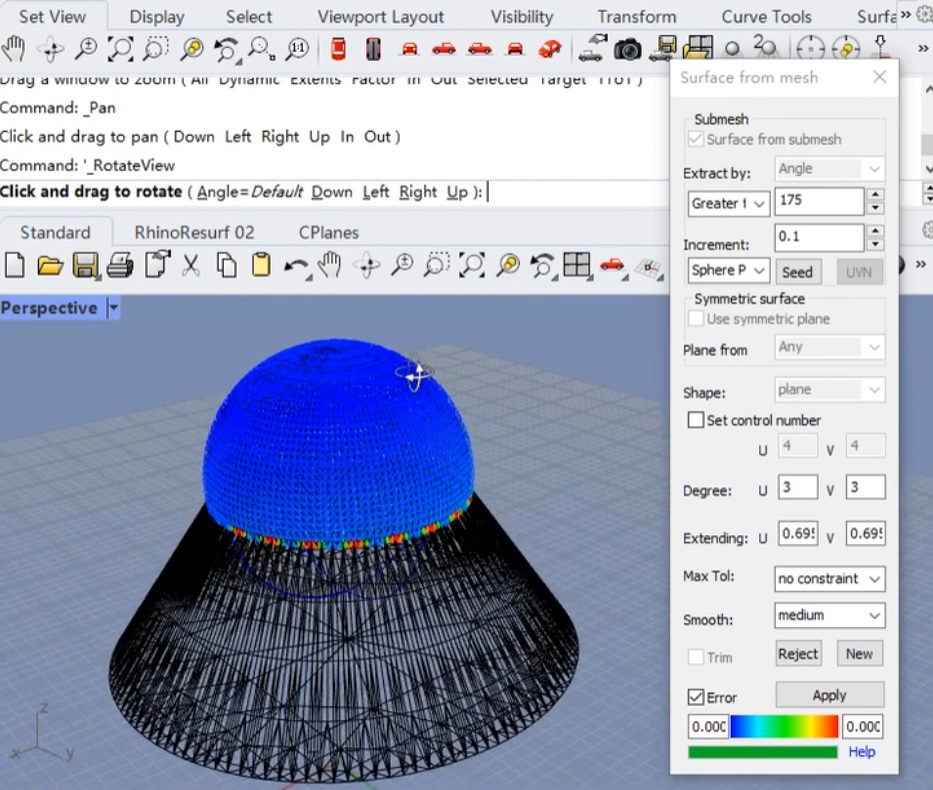
4. Click "Surface from submesh", choose "Extract" option as "Angle" . Click button "Seed" and pick a mesh face as source element for submesh growing.
5. Choose a type of "Shape" that suits the submesh.
6. Click "Apply" to create surface.
Dialog description:
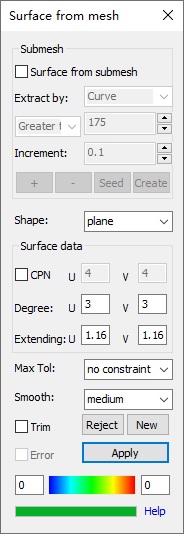 |
Surface from submesh : this check box let user have the ability to select closed lines to define submesh on the selected mesh. If this check box is checked, the Create button will be enabled, the Trim button will be disabled; Extract by: method for extracting sub-mesh from whole mesh model. There are 4 methods to extract sub-mesh:
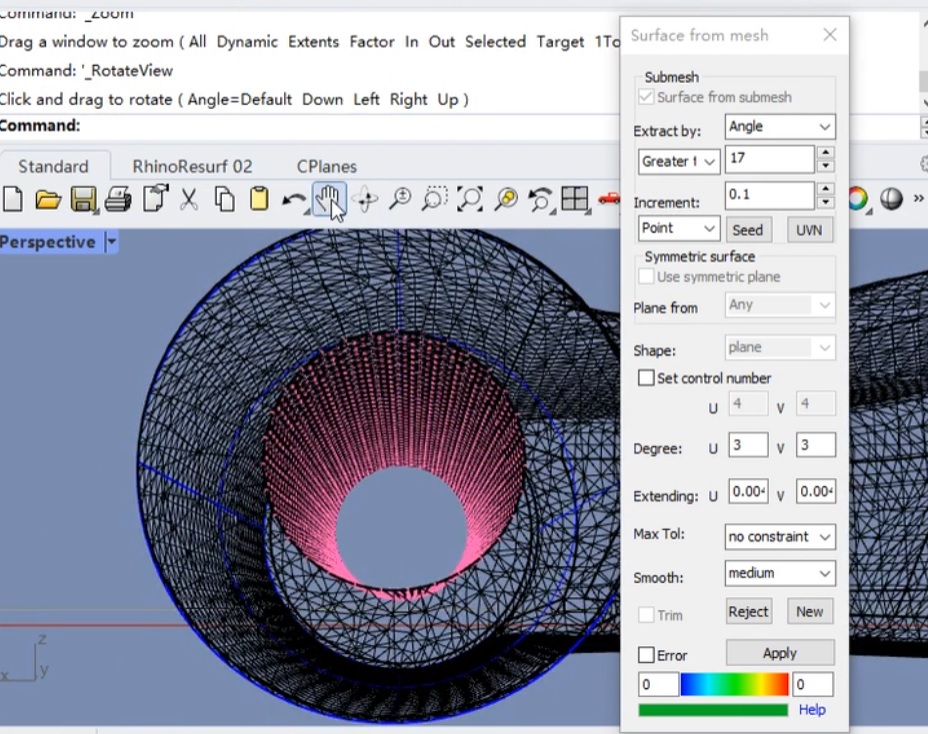
Increment: sets the incremental value of the angle change. Seed: after you checked the from submesh button and choose Extract option as Angle, this button will be enabled. Click this button, select a mesh face as seed, then adjust the angle value, you will see the mesh face growing outward, you click Apply button to create a new surface. You can click this button to extract new submesh for new surface generation.
create surface by global mesh (video link: https://player.vimeo.com/video/669421539?h=3b8d4d6d98)
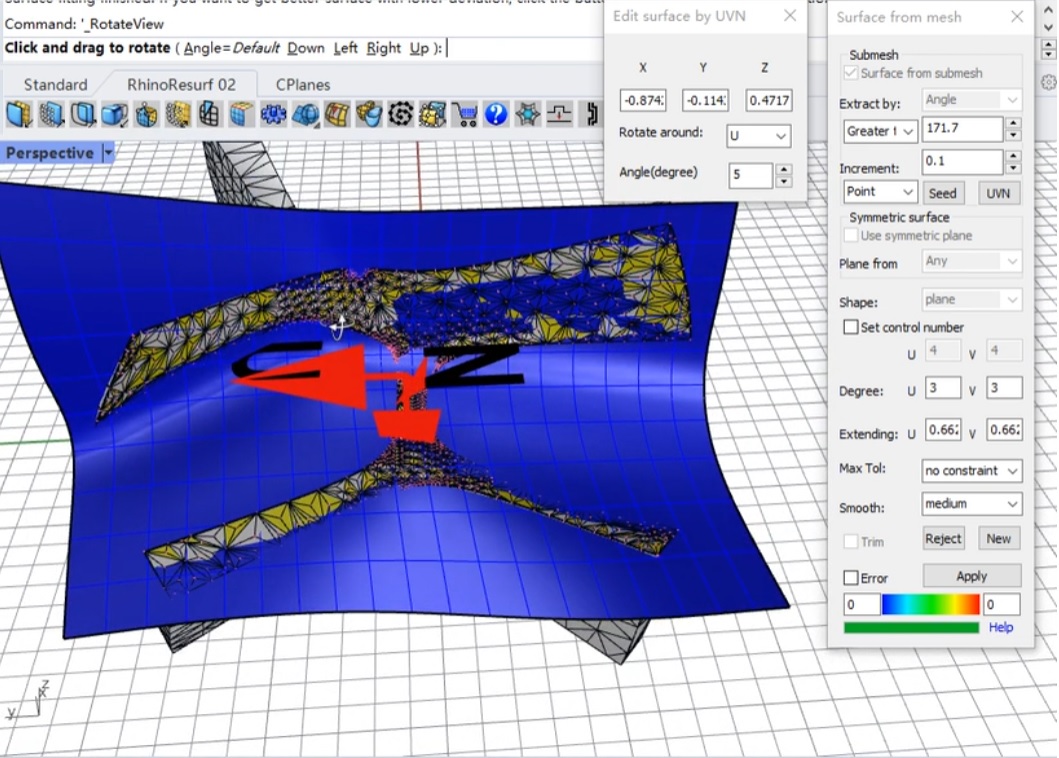
edit surface by UVN (video link: https://player.vimeo.com/video/740014415?h=78634e1e9e )
fit sphere from mesh (video link: https://player.vimeo.com/video/745265131 )
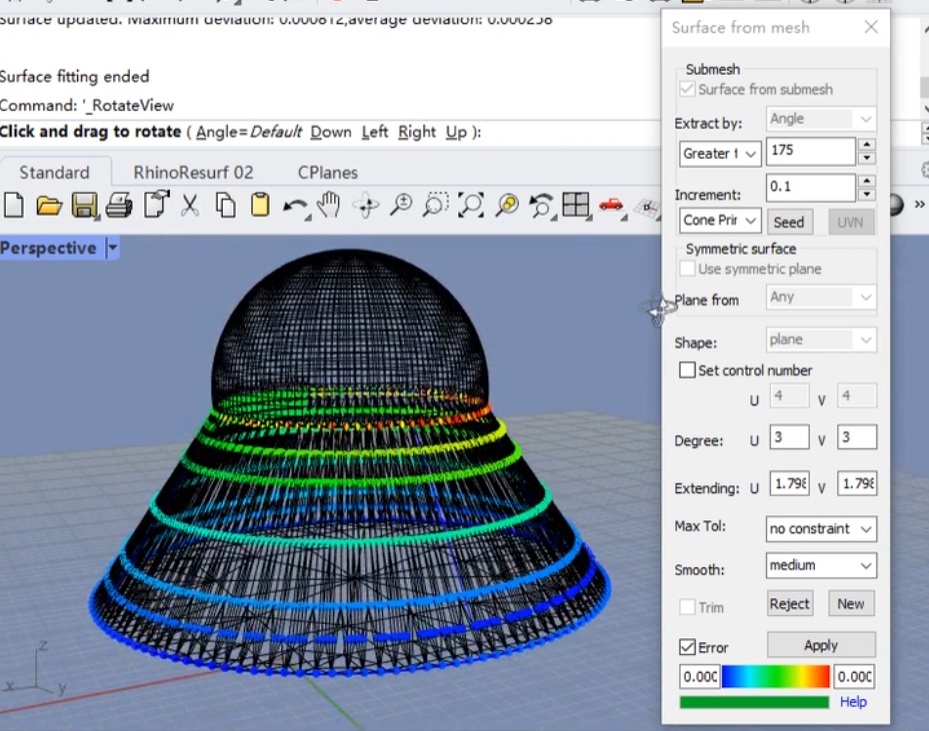
fit cone from mesh (vieo link: https://player.vimeo.com/video/745264288 ) (video link: https://player.vimeo.com/video/745264288 )
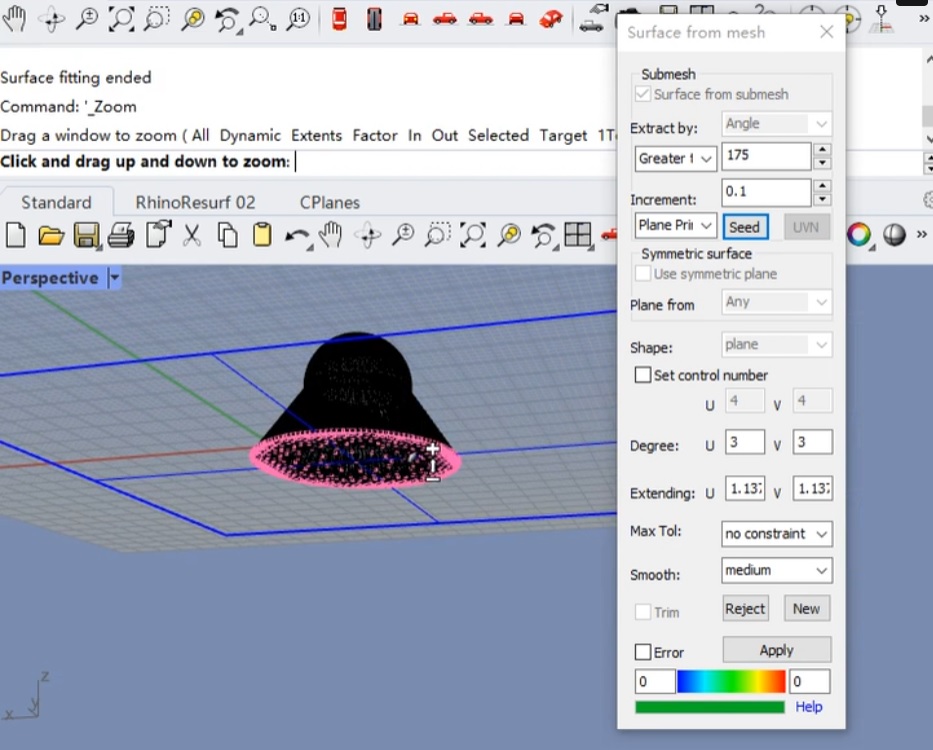
fit plane from mesh (video link: https://player.vimeo.com/video/745264773 )
fit cylinder from mesh ( video link https://player.vimeo.com/video/745263946 )
Create: after you checked the from submesh button, this button will be enabled. Click this button, select some lines to make closed loop, then click right-mouse button, a new surface with the specified tolerance will appear. If you would like to adjust the tolerance of the surface, reset Max Tol and click Apply button, the surface will update. -------------------------------------------------------------- Shape: topology shape of your mesh model. For single surface from whole mesh, if your mesh model is like plane, choose plane homeomorphous; if your mesh model is like cylinder, choose cylinder homeomorphous;if your mesh model is like semisphere, choose semi_sphere homeomorphous. For surface from submesh, the items include: Free by point: create free-form surface by using point position only; Free by topo: create free-form surface by using point position and mesh topology data; Plane Primitive: create a plane primitive from submesh; Sphere Primitive: create a sphere primitive from submesh; Cylinder Primitive: create a cylinder primitive from submesh; Cone Primitive: create a cone primitive from submesh; -------------------------------------------------------------- CPN( Set control point number): this check box let user have the ability to set an initial control point number for the surface. Such as u = 43, v = 23. This check box is only designed for those users who would like to control the surface in advanced way. Sometimes, if user type a reasonable control point number, it will be helpful to increase the speed. Generally, however, user does not need to care this control number, the program will calculate a suitable number automatically. Degree: surface degree in u-direction and v-direction. Extending: the extending value which user wants the surface to extend in U-direction and V-direction. -------------------------------------------------------------- Max Tol: the maximum deviation between surface and mesh. Smooth: the smooth controller of the surface. Trim: to trim or untrim the generated surface with the boundary line of the mesh. Reject: discard the surface. New: pick a new mesh model to reconstruct a new surface, and the currently obtained surface will be retained. Error: check this button to analyze the deviation error between mesh and surface. Apply: user clicks this button to generate surface. After a surface is generated, if the tolerance is not desired, continue to click this button to get a surface with a desired tolerance. |
Tutorial:
Creating a single surface from mesh.
Creating a single surface from sub-mesh.